
Retro Gauge Clusters: Swapping Vintage-Style Dials into Modern NDs
The ND uses step-motor analog gauges around a central LCD. A face swap only replaces the printed dial plates—no software or electronics change. Backlight LEDs and warning icon positions are fixed, so the new faces must align perfectly and won’t alter LED color. .


The ND’s cluster is a hybrid: analog step-motor gauges for speed, revs, fuel, and temperature wrapped around a central multi-information LCD that also shows your digital speed. A face swap only replaces the visible dial plates that sit over Mazda’s LEDs and windows, you’re not rewriting software or changing the electronics. Backlights and warning icons live on the circuit board in fixed locations, so the new faces need to line up precisely. They also won’t change the LED color or hue. The LCD is a removable module, but replacing it with a custom display is a separate CAN/electronics project, not part of a weekend face swap.
The “Retro” Look
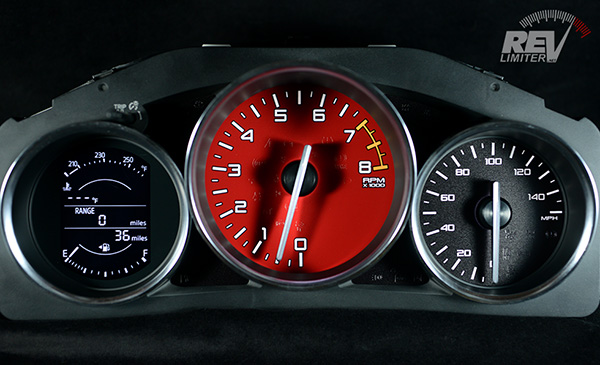
Purpose-built faces are laser-cut and screen-printed to preserve every stock indicator, plus the LCD window. Many offer a six-o’clock needle zero for that old-school feel. Illumination stays OEM in color and brightness. Good kits include ND-specific tutorials so you know where spacers go and how to handle the needle light pipes.
Hunting a different cluster for a different scale or look invites odometer integrity questions, coding time, and legal hassle. Unless your cluster is actually failing, this isn’t worth it just for aesthetics.
Custom firmware and TFT LCD conversions exist, but that’s a full electronics build with CAN decoding, packaging work, and lots of testing. Cool project, just not the same thing as retro faces.
What to Buy and How to Judge Quality
You’ll want an ND-specific gauge face kit that clearly states ND1/ND2 compatibility, the exact LCD aperture shape, and icon alignment. Add trim tools, a Phillips screwdriver, nitrile gloves, microfiber cloths, canned air, and proper needle pullers. Optional items include a fresh clear lens or bezel and an anti-static brush. High-quality faces have crisp laser apertures around tiny icons, an OE-like surface texture, even light diffusion at night, ND-specific spacers where needed, and a step-by-step ND install guide.

Removal and Bench Prep
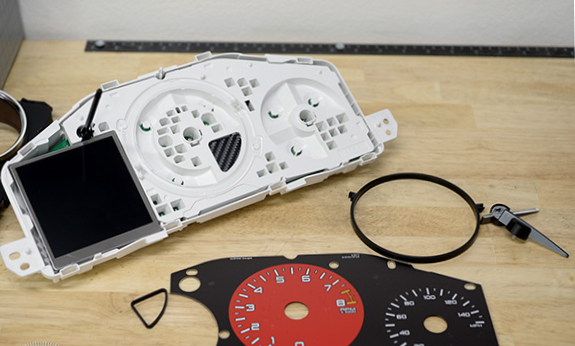
Disconnect the negative battery terminal and give the car a minute or two to sleep. Pop the cluster hood/cowl with plastic trim tools, remove the screws, and slide the cluster forward to reach the connector. Work on a clean, lint-free bench. Separate the clear lens and front mask carefully. Take photos of the stock cluster from multiple angles; those references make re-indexing painless.
Needle Handling, Face Swap, and Alignment (The Scary Part Made Easy)
Before touching needles, index them: take photos with the car off, then key-on/engine-off, then at warm idle. Pull needles straight upward, no prying under the cap. Dry-fit the new faces and any spacers to confirm every warning icon window and the LCD opening align perfectly. After installing the faces, reseat needles lightly and do a gentle manual sweep to feel for rubbing. Don’t fully press needles home until you verify illumination and a powered sweep.
Power-Up Tests Before You Button It Up
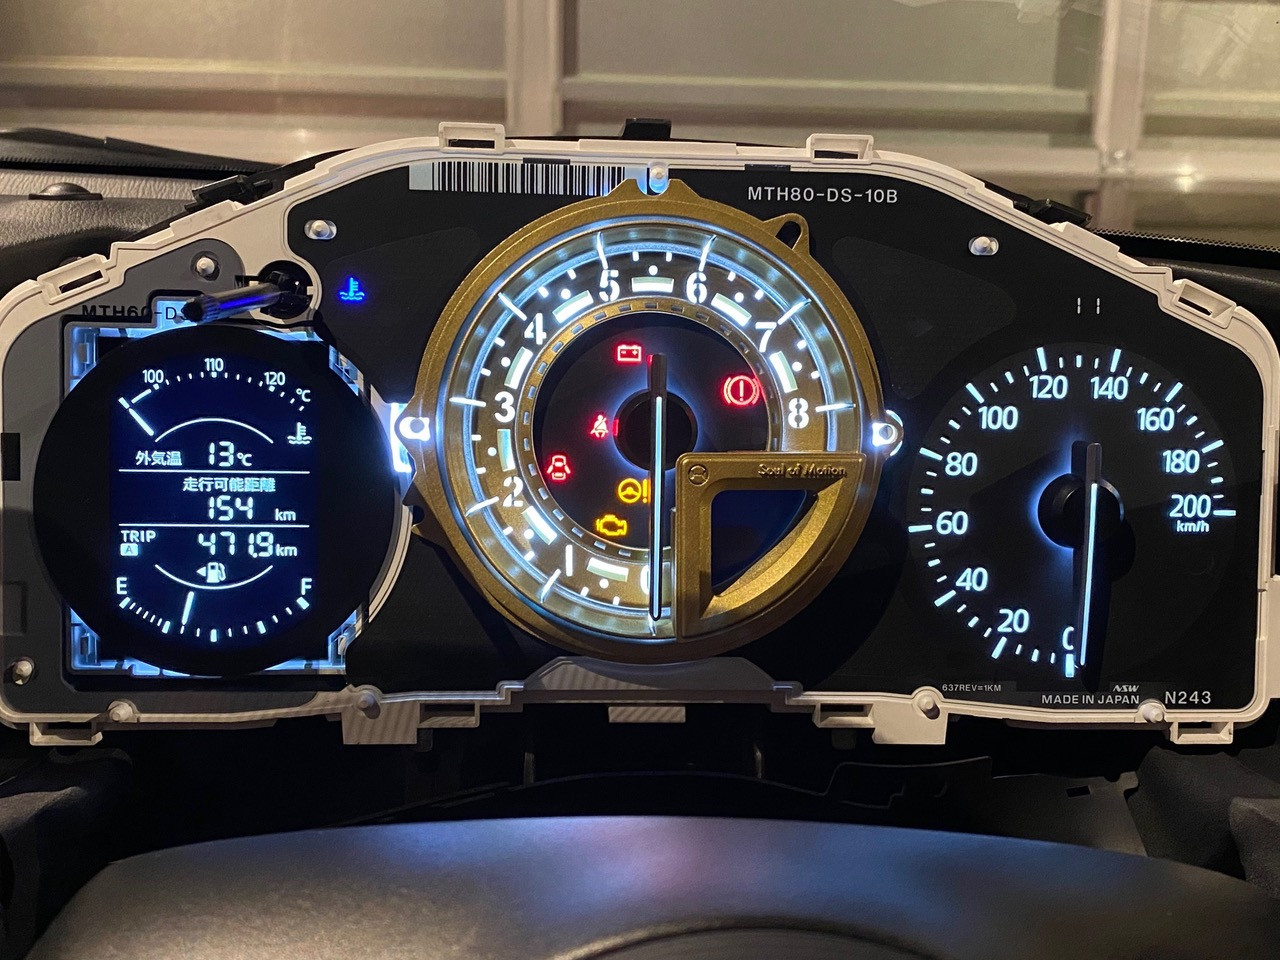
Run the key-on bulb test: indicators, high beam, check engine, ABS, TPMS, seatbelt, oil, and any driver-assist icons if equipped. You’re checking for clipped icons or light bleed around cutouts. Start the engine and sanity-check the tach at warm idle. On a short drive, compare analog speed to the MID’s digital speed; use the digital readout as your truth when fine-tuning needle indexing. At night, look for hot spots and halos, well-made faces diffuse light evenly.
Units, Legality, and Odometer Integrity
If you travel between regions, choose dual-scale markings on the face. The MID’s digital speed keeps you legal regardless. If you ever replace the whole cluster, expect configuration steps to keep odometer and feature behavior correct. Keep documentation of any hardware change. A face swap alone doesn’t touch odometer data.
Time, Difficulty, and Risk
Budget about one-and-a-half to three hours if you work carefully in a dust-controlled space. The main risks are bending a needle, mis-indexing a needle, or trapping dust under the lens. Slow down, dry-fit, test in stages, and you’ll be fine. Full cluster replacement adds coding time and paperwork, avoid it unless necessary.
Common Pitfalls
Bent or binding needles happen when you pry sideways, always pull straight up and test sweep before final press. Misaligned icons come from skipping the dry-fit, run the bulb check before sealing the lens. Expecting a new backlight color will disappoint, the LEDs are fixed, so pick designs that look good with Mazda’s stock lighting. Dust sneaks in at the end, gloves on, one last microfiber wipe, a small puff of canned air, then snap the lens in place away from blowing vents.
What Separates “Fine” from “Fantastic”
Great sets are engineered explicitly for 2016+ with ND1/ND2 differences documented, include any plastic spacers needed, use durable inks on polymer with an OE-like texture, and arrive with a thorough ND install tutorial covering light-pipe and needle-cap quirks plus indexing tips. Responsive support and options for custom fonts or secondary units are a big plus.
If a future TFT is on your mind, a careful teardown with LCD module measurements helps you understand packaging and mounting limits. Community firmware and CAN threads are fun to read, but treat them as experimental and separate from the retro-face project.
Trip computer pages cycle correctly; outside temperature displays; cruise or speed limiter set-speed shows; average and instant fuel economy pages work; any driver-assist icons (if fitted) illuminate properly. Night visibility is even with no hot spots or ghosting. Analog speed agrees with the MID’s digital speed within about a needle width at steady cruise. The lens is spotless, cleaned with a plastic-safe cleaner and a fresh microfiber.
Your Tear-Out Card
Tools: trim tools, #2 Phillips, needle pullers, nitrile gloves, microfiber, canned air, and painter’s tape for temporary labels. Prep: disconnect battery, shoot reference photos, and work in a low-dust room. Order of operations: remove cluster, open lens, dry-fit faces and spacers, run bulb check, light needle press, power-test sweep and a short drive, final press, final clean, reassemble. If a needle reads slightly high or low after testing, pull gently, rotate a hair, reseat lightly, and retest against the MID.


