
Miatas for Taller Drivers: Mod Guide
Taller drivers might struggle with headroom and seating position. Luckily, “tall-man mods” like lower seat mounts, steering wheel adjustments, and pedal tweaks can improve comfort. Here’s a guide to the best modifications for more space without sacrificing driving enjoyment.


The Mazda MX-5 Miata is practically synonymous with fun, weekend roadster vibes. However, if you’re taller than average, you might find yourself adjusting and contorting just to see out the windshield. The good news? There are plenty of ways to tweak the Miata cockpit, often called “tall-man mods”, so you can stop hunching over. Here’s a full run-through of some of the best modifications for taller drivers, with a laid-back, straightforward look at the pros and cons of each.
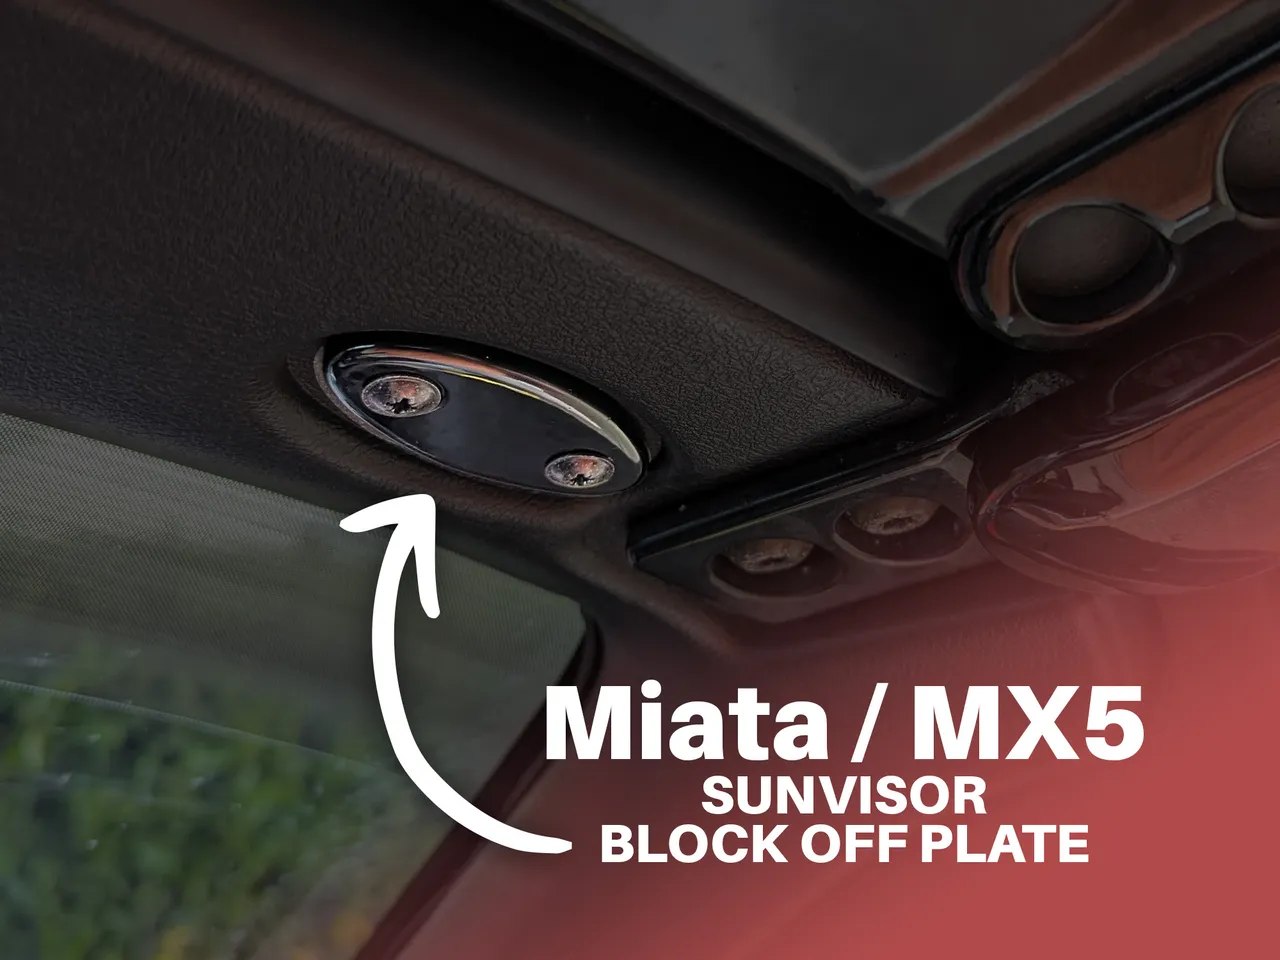
Sun Visor Delete
If you’ve ever tried to pull up to a red light in a Miata and found your visor blocking half your field of vision, you already know why this mod matters. On older NA and NB models, especially, the visors sit so close to the windshield header that taller drivers can’t comfortably see out. Removing these visors is a straightforward process: typically, there are two Phillips screws in each bracket. Once you take those out, you can lift the visor off and plug the holes with “visor delete” plates, commonly available on eBay or from small Miata specialty shops. One word of advice: keep your stock visors and hardware somewhere safe in case you ever want to go back to OEM style. But for the immediate payoff, having that extra inch or two of unobstructed view up front is huge, and if you combine this with a lower seat setup, you’ll stop doing that awkward duck-and-peek at traffic lights.
Seat Modifications
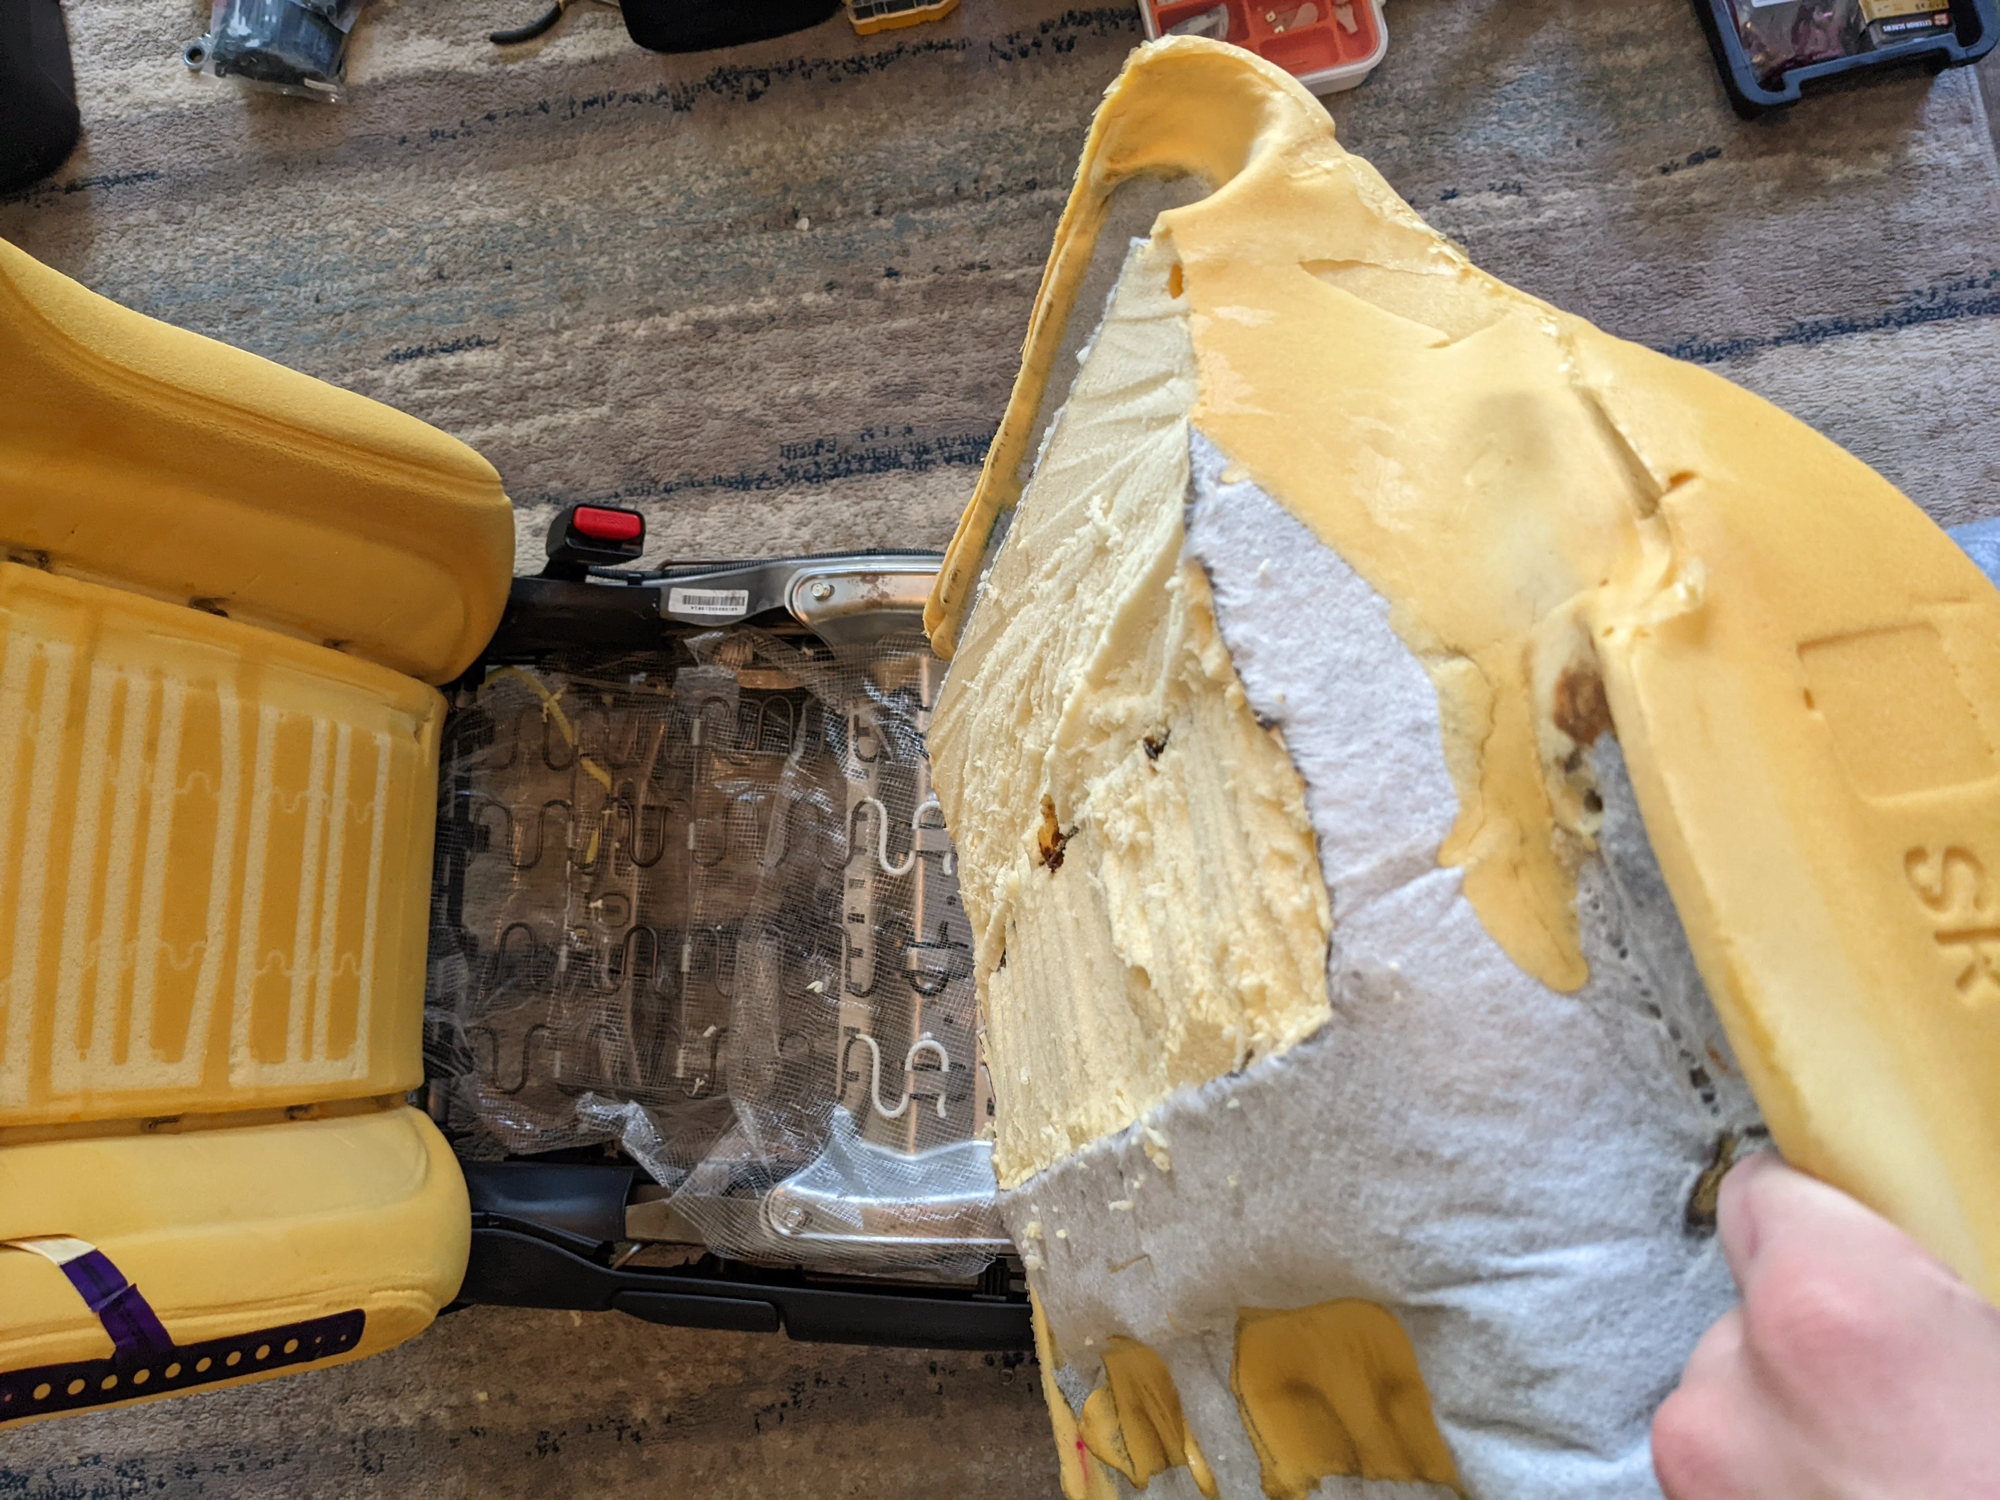
For most tall Miata owners, the seat is the place to start. One popular option is a “foamectomy,” which involves removing the seat, peeling back its cover, and trimming out some of the foam where you make the most contact. By doing so, you can generally sink yourself an inch or two lower in the seat. The beauty is that it’s practically free, just the cost of your tools and your time. Some folks worry about comfort on longer trips, but if you trim slowly and test frequently, you should find a sweet spot that nets you extra headroom without turning your seat into a cardboard plank.
If that’s not enough, consider new seat rails or brackets that physically lower the seat frame. Options from companies like Jass Performance, Cybul, and GarageStar can drop you down another inch or two, or move your seat further back for more leg stretch. The NC Miata even has a popular “GordyM” mod that uses spacers to lower the rear of the seat pan. Installing seat brackets generally means unbolting the stock rails, attaching the new rails to the seat bottom, and bolting everything back in. It’s not too complicated, but you do have to double-check seatbelt angle, wiring, and ensure that everything can move freely without interference. For those who want maximum possible interior space, switching to an aftermarket bucket or fixed-back racing seat is also an option. Racing shells tend to have less foam and a narrower base, so they can position you significantly lower. This is great for track enthusiasts but can be a tradeoff for daily comfort, not to mention potential issues with airbag wiring or seatbelt sensors on NB and NC models.
Steering Wheel Spacers & Aftermarket Wheels
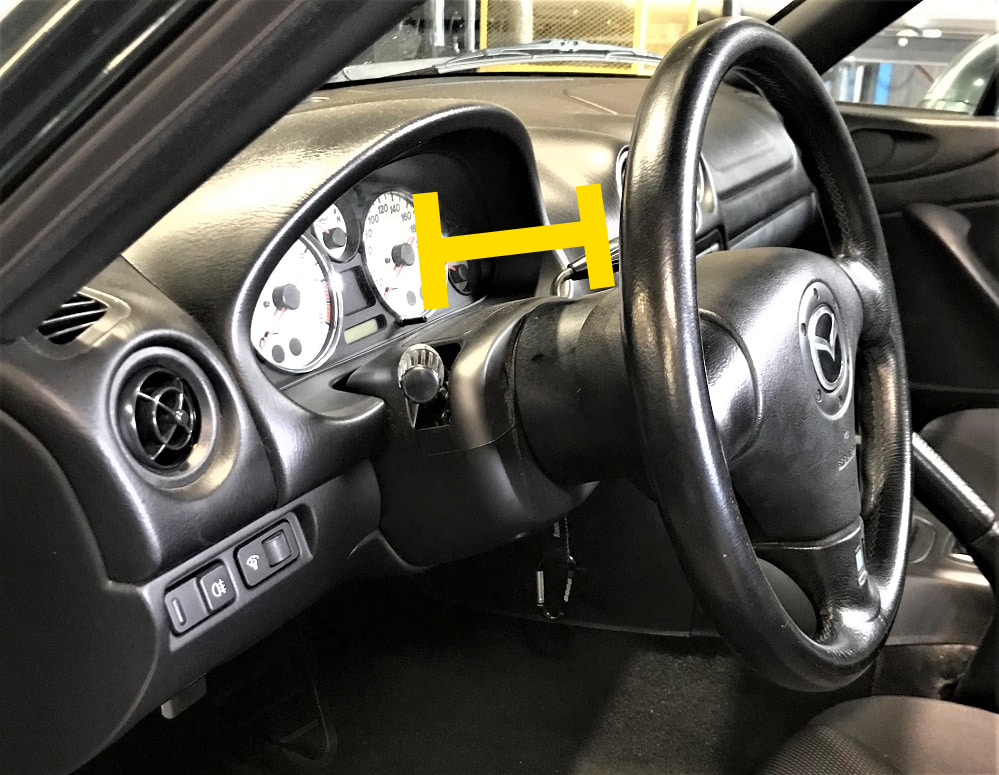
If you’re tall, chances are you’ll scoot the seat back for more legroom, which can leave you reaching for the wheel. Adding a steering wheel spacer or installing a wheel with a deeper dish helps fix that problem by bringing the rim closer to you. Common spacer sizes range from 25 mm to 50 mm, but you can go even more extreme if you really need the wheel right at your chest. This mod typically requires you to remove the wheel, which involves disconnecting the battery (so the airbag system won’t cause issues), taking out a couple of Torx bolts to free the airbag, unbolting the main steering nut, and then adding your spacer in between. If you’re sticking with the stock wheel, you may have to extend some horn or airbag wires. Installing an aftermarket wheel can further enhance leg clearance if you pick a smaller diameter or a flat-bottom design, but most of the time you’ll lose the factory airbag. If you want to keep an airbag, a spacer on the OEM wheel is usually the way to go.
Fine-Tuning Your Driving Position
Even after you adjust your seat and steering wheel, you might still feel cramped in the footwell or find yourself awkwardly leaning forward to shift. That’s where pedal and shifter mods come in. A shifter extension adds a few inches (or an angled bend) to the gear lever so you’re not forcing your elbow into the cupholder area while shifting into second or fourth. These extensions are easy to find online and simple to install: you unscrew the stock knob, thread on the extension, and then replace the knob. If you want even more refinement, you can add washers behind the top bolts of your pedal assembly to tilt the gas or brake pedal away from you slightly. Trimming the pedal arm on older NA/NB models or removing the bulky dead pedal on the left side can also help free up some knee and foot space. These are smaller tweaks overall, but they really help dial in that perfect driving position once you’ve tackled the bigger seat and steering changes.
Door Bushings for a Solid Feel
While it won’t give you extra inches of headroom, swapping out your stock rubber door bushings for stiffer polyurethane or metal bushings can tighten up the chassis feel. You’ll notice fewer rattles and squeaks once you’re lower in the cabin and paying attention to every noise. Companies like “Just Send It,” Jass Performance, and IL Motorsports all offer different versions. Consider this a bonus mod that won’t affect how much room you have, but might make your ride feel more refined overall.
Which Generation Fits Best?
With four generations of Miata now (NA, NB, NC, and ND), it’s fair to wonder which is friendliest to tall folks. The NA (1990–1997) and NB (1998–2005) cars have the tightest cabins and the lowest windshield header, so if you’re around six feet or taller, you’ll probably want at least a foamectomy or an aftermarket seat plus a steering spacer. The NC (2006–2015) has a notably bigger interior, taller windshield, and sometimes includes seat-height adjustment from the factory. The ND (2016–present) is similar in interior size to the NC, though many drivers report that the seats feel a bit more “bucketed,” which can be good or bad depending on your preference. If your main priority is legroom and headroom, a well-modded NC might edge out the ND, but you can make all generations manageable with the right parts.
Putting It All Together
If you’re tall and looking for a solid starting point, try a modest foamectomy or seat-lowering bracket to immediately get your head out of the roof, then add a 25–50 mm steering wheel spacer so you can sit back without overextending your arms. You can remove the sun visors to see traffic lights easier, install a shift knob extension so your elbow doesn’t smack the console, and even tilt your pedals slightly if your knees are still cramped. Each step makes the cockpit feel more tailored, and the combination can dramatically improve comfort, both day-to-day and during spirited driving.
Frequently Asked Questions
A big question is whether you lose the airbag if you change the steering wheel. Generally, yes, an aftermarket wheel means no stock airbag, but a spacer on the OEM wheel can let you keep it if you’re willing to do a bit of wiring work. Folks also wonder about seatbelt compatibility with these mods: for the most part, seatbelts still work as intended, but if your model has seatbelt sensors or integrated airbags, you’ll need to verify you’re not pinching any wires. As for resale value, most of these tweaks (like visor deletes, wheel spacers, or seat brackets) can be reversed if you keep your original parts. Finally, prices vary: a foamectomy is basically free if you already have tools, while visor delete plates might run you $15–$40, steering spacers $50–$200, and seat-lowering brackets $80–$300. A small price to pay for a comfortable Miata-driving experience.
Being tall doesn’t disqualify you from enjoying a Miata, far from it. Focus on lowering the seat and bringing the steering wheel closer to solve the biggest issues. From there, it’s all about refining your seating position with visor deletes, pedal adjustments, and maybe a shift knob extension. Before you know it, you’ll be cruising with the top down, enjoying that legendary Miata handling without feeling like a sardine in a can. It’s all about tweaking the cabin to fit you, so you can properly appreciate why the MX-5 is such a beloved driver’s car. Enjoy!


