
Let's Talk About Miata Underbody Aero
Most Miata aero chats fixate on wings, but the real gains hide underneath. A matched splitter–flat floor–diffuser package speeds and manages under-car airflow for stable, low-drag downforce.


Most Miata aero talk revolves around wings and bumper lips, but the biggest untapped canvas is the underside of the car. A well-matched splitter–flat floor–diffuser setup can add serious, stable downforce with relatively low drag compared to relying on a giant rear wing alone. In simple terms: you speed up the air under the car, keep it attached, then expand it cleanly at the tail so pressure stays low and the chassis gets pushed into the pavement. This guide sticks to fundamentals and packaging realities, mainly NA/NB where the underside is wide open, while noting the NC/ND advantage from factory undertrays and how aftermarket kits extend those gains. As tires, power, and brakes improve, underbody aero becomes the next limiter for confidence and lap time.
How Air Flows Under a Mostly-Stock Miata
From the front crossmember to the fuel tank, the stock underbody is a maze of steps and edges, exhaust, subframes, arms, braces, that trip the boundary layer and cause separation. That messy flow adds drag and traps higher pressure under the car, which shows up as lift and a light, nervous feel at speed. Generationally, NA/NB have the most to gain because they’re basically open underneath.
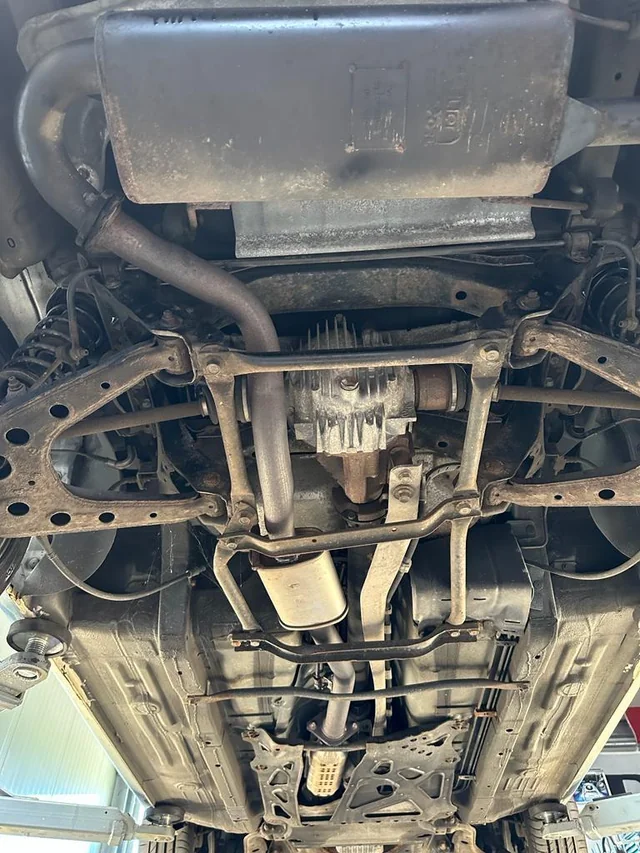
NC introduces more covers and a stiffer tub, and ND goes further with purposeful undertrays and shields; both still benefit from filling the gaps for a more continuous channel. The ground-effect gist in one paragraph: force air through a narrow road gap using a splitter and floor, it speeds up and pressure drops; then a diffuser expands that fast stream without stalling it, maintaining lower pressure and pulling the car down harder as speed rises.
Splitters: What They Do, How to Mount Them, and Where They Live
A real splitter is structural and extends back under the nose, not a cosmetic lip. Up top it builds a high-pressure stagnation zone; underneath it creates low pressure and keeps extra air from cramming under the car in the first place. On NA/NB, pairing a proper airdam with a splitter is a power move: the airdam blocks underflow and the splitter exploits the pressure split for front grip and often a small drag win. Mounting matters more than material, feed loads into the chassis or frame-rail brackets, not the flexible bumper cover. Seal the bumper to the splitter for airflow, but let the structure carry the downforce. Choose your overhang (forward reach), chord (how far it runs under the car), and construction (birch ply for easy fixes, aluminum or HDPE for durability, composites for stiffness and weight). Keep it close to the ground for effect but realistic for real roads; many track setups live around 60–90 mm of clearance, with a touch of rake (nose lower than tail) to help keep flow attached for the diffuser later.
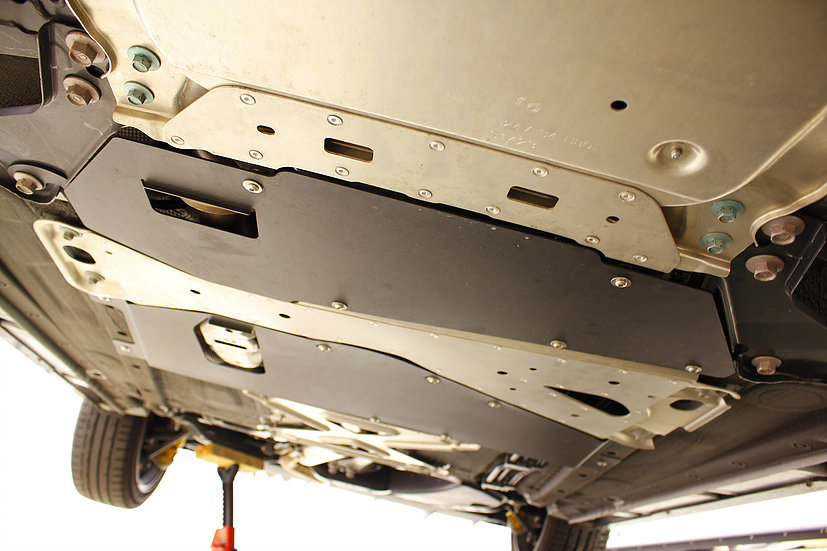
Flat Floors and Underbody Panels
A flatter underbody reduces drag, keeps the flow attached, and lets the diffuser actually “see” clean, high-energy air. It also makes splitter suction more uniform so the front end feels calmer over bumps and at yaw. You can build in segments, front tray from the splitter to the crossmember, center/tunnel panels under the cabin, and rear subframe/tank panels, or go full-length on a serious build. NC/ND start with useful OEM pieces; finishing the missing sections makes the biggest difference. Material choice is a trade: aluminum is strong and heat-tolerant but likes ribs and hangers; ABS/HDPE are impact-friendly but need support to avoid sag; composites are light and stiff but pricier. Design for service with removable panels, and manage heat near cats and mufflers with standoffs, shields, or louvers. Don’t forget the edges, foam or rubber seals at rockers and bumper interfaces plus modest side skirts cut off “spillage” and keep the floor working consistently.
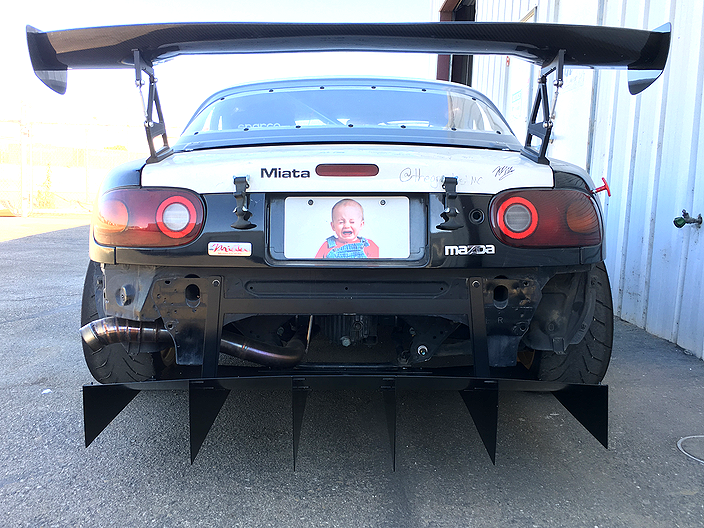
Diffusers: Why They Work and Why They Often Don’t
The fast, low-pressure flow from your flat floor expands through the ramp without separating, which keeps pressure low enough to keep pulling the car down while also pumping air out from under the floor. Classic design knobs are throat height, ramp length, and expansion angle (often kept in the low-double-digit range to avoid stall), plus width relative to tire wakes and simple strakes to fence off messy vortices. Packaging is the Miata trick: NA/NB fuel tank, rear subframe, and a transverse muffler steal the best real estate. Many builds slim or relocate the muffler, often to a center exit, to gain diffuser volume and start the ramp sooner. ND/NC have it a bit easier, and bolt-on kits are shaped around the factory trays and bumper. The harsh truth: a diffuser bolted to a turbulent, stock underside will underperform and drag more than expected. Feed quality beats more angle every time.
Splitter → Floor → Diffuser
Think bumper-to-bumper. The airdam and splitter meter how much air goes under vs over; the floor keeps that underbody stream fast and attached; the diffuser expands and extracts it. Get that path right and your rear wing also wakes up because the base pressure behind the car drops. Balance matters: too much front (big splitter, no rear help) gives razor turn-in with a nervous tail in fast transitions; too much rear (big wing/diffuser, tiny splitter) gives lazy turn-in and mid-corner push. Tune with splitter size and height, overall rake, diffuser length and angle, and wing angle of attack, then verify with data, not vibes.
Street vs Track: Constraints, Rules, and Side Benefits
Underbody aero scales with speed; at commute pace you’ll mostly notice a calmer cabin and a bit of highway efficiency from less underbody turbulence. Keep street splitters thin with rounded edges and add sacrificial skid pucks where curbs nibble. Before you drill anything, read your class rules: splitter protrusion limits, what counts as an undertray, and whether diffusers are legal vary a lot between autocross, time trial, and endurance series. Bonus points: a smoother underside often trims wind noise and can nudge highway fuel economy in the right direction.
Plan First, Then Cut
Decide target ride height and rake, then map the exhaust path, jack points, and tow hooks. Sketch mounting along frame rails, subframes, and rocker pinch welds, and use existing threaded holes where you can. For splitters, use rail-tied brackets or a tubular frame and let the bumper just seal. Chamfer edges, radius corners, and protect high-wear zones with wear strips or skid pucks. For floors, template in cardboard, break the design into serviceable sections, hang panels with rivnuts or nutserts, and vent or shield hot spots. For diffusers, start the ramp where the floor ends cleanly, not in turbulence; gain volume by re-packaging the muffler if needed, and align strakes with tire wakes and subframe gaps to keep the flow tidy.
Data and Driver Feel
Tuft testing is cheap and brutally honest, tape short yarn pieces near the diffuser exit or safe, shielded floor edges and film with an action cam. You want steady, rearward flow lines rather than random flapping. On-track, compare trap speeds and minimum corner speeds before and after changes, holding tires, fuel, and conditions as constant as possible. Driver-feel clues help triangulate: if the front is over-aero’d, you’ll love initial bite but the rear feels floaty in fast esses; if the rear is over-aero’d, the car feels planted but lazy to rotate. Adjust in this order: splitter height/size, then wing angle or diffuser angle, then overall rake.
Don’t treat splitters, floors, and diffusers like three unrelated bolt-ons. You’re building one airflow path from the nose to the tail. Set a clear goal, lap time, stability, or highway calm, build in stages, validate each step, and respect the practical stuff: structural mounting, ground clearance, class rules, and the learning curve that comes with new grip. When you’re ready to go deeper, pair this with data overlay for testing, your wing and chassis-bracing work for top-side balance, and eventually CFD or product shootouts once the fundamentals are maxed out.


