
How to Replace Miata Door Hinges for Smooth Operation
Drooping doors, chipped paint, or a mid-swing clunk are common Miata issues after decades of wear. The solution is simple: refresh hinge bushings and pins, or replace hinges if needed. This guide covers diagnosing wear, supporting the door safely, and reinstalling hinges with proper alignment.


Saggy doors, chipped paint at the striker, and that clunk halfway open, classic Miata problems after decades of use. The fix is straightforward: refresh the hinge bushings and pins, or swap the hinges entirely if they’re worn. Below is a step-by-step that mirrors what owners actually do at home, including safe ways to support the door, which pins go which way, and how to get alignment right on the first try.
A healthy Miata door lifts cleanly and closes flush with even gaps. If yours drops when you lift on the handle, needs a slam to latch, or rubs the sill or striker, you’ve got play in the hinge bushings/pins or the hinge plates are ovalized. For a quick test, crack the door open about an inch, grab the lower outer corner, and lift straight up. Watch the hinge knuckles: any visible vertical movement between the halves means wear. Also sight down the body line from the fender to the door; if the door skin sits proud or tucked, alignment is already off.
Tools and Parts
Must-haves: a floor jack with a wide wood block (soft pine is great) or an unmounted tire as a paint-safe stand, painter’s tape and fender covers, a spring compressor tool for the door-check spring (or a dedicated door-spring tool), a punch set (include a brass punch for driving pins without marring), a small chisel, a small fork/clip remover or needle-nose pliers, a hammer, and 12 mm box wrenches/sockets (NA/NB).
Parts: replacement hinge pins, clips, and bushings; or complete hinges if the bores are egged out. Add blue threadlocker and a paint pen or scribe to outline hinge positions.

Nice-to-haves: ratchet straps for an under-door sling, a magnet-on-a-stick (for launched clips), Scotch-Brite, a little light oil for pin lube, and penetrating fluid for stubborn pins.
Prep tips: roll the window fully up (adds stiffness to the door shell), unlock the car to avoid latch headaches, and park on level ground so you can read gaps consistently.
Safety and Setup
If you’ll unplug door wiring for full removal, disconnect the battery first. Mask the trailing edge of the fender lip, both vertical door edges, and the painted sill. Support the door before loosening or driving any pins; you want the door held at its natural height and attitude, not jacked higher, so reassembly lands where it should. If you’re using a jack, put a bath towel on the wood block to protect paint.
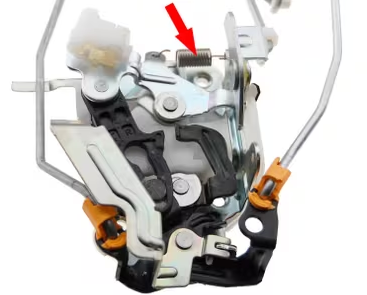
Step 1: De-tension the Door-Check Spring
Open the door and fit the compressor tool onto the check spring stack. Snug until the detent’s resistance relaxes, then slide the check arm free of its slot. Keep your face and hands out of the spring’s line of fire; a slipping tool can snap back. If the pin is splined, support the check bracket from behind so you’re not flexing thin sheet metal.
Step 2: Support the Door
Pick your method and take 30 seconds to “zero” the door height before you touch hardware.
- Floor jack + wood block: place under the horizontal pinch seam at the outer skin’s underside (not the thin edge of the skin itself). Gently lift until the door gap to the sill matches the passenger side.
- Unmounted tire: slide it under the door; the rubber cradles and won’t mar paint, great height on NA/NB.
- Ratchet-strap sling: loop two straps under the door and up to an overhead beam or a roof rack crossbar; ratchet until the door sits level. This is the most stable if you’re solo.
Pro tip: tape a small ruler or a marked piece of tape to the B-pillar and note the gap at mid-door. That “reference number” helps you return to baseline during alignment tweaks.
Step 3: Remove Hinge Pin Clips and Pins (NA/NB focus)
Each pin is retained by a tiny clip, take a photo of each before you move it. Orientation matters:
- Upper hinge pin installs bottom → up.
- Lower hinge pin installs top → down.
Pop the locking clip off the exposed end with a fork tool or pliers. Drape a rag over the area so the clip doesn’t ping into space. Place a punch on the small end of the pin and drive it in the reverse of its install direction to break the press fit. So:
- Upper pin: drive down first to unseat, then slide out downward.
- Lower pin: drive up first to unseat, then slide out upward.
If corrosion has mushroomed a pin end, kiss the lip off with a small chisel before punching. A shot of penetrating fluid and two minutes of patience helps. Keep the door supported; once both pins are out, only the wiring keeps the door from walking away.
Step 4: Separate the Hinge Halves and Remove Bushings
Swing the door slightly away to split the hinge knuckles. You’ll see the old bronze or nylon bushings in the eyes. Drive each bushing toward whichever side gives you a straight shot: typically top bushings tap downward and bottom bushings tap upward. Use a flat punch that matches the bushing OD so you don’t flare it inside the bore. After removal, scrub the bores with Scotch-Brite and knock down burrs; a clean, square bore is what makes the new bushings seat flush and prevents early wear.
Check the knuckles now: if the bushing seat is visibly oval or cracked, you’re wasting time, plan on full hinge replacement.
Step 5: Install New Bushings (NA/NB sizing note)
Typical NA pattern: on the upper hinge, the smaller bushing installs from the top down and the larger from the bottom up. On the lower hinge, the larger bushing commonly lives up top (top-down) and the smaller bottom-up. Kits differ, match what came out rather than forcing a tight bushing into the wrong eye. Drive each bushing in square using a socket that contacts the outer rim, not the thin lip. They should sit flush, no proud edges.
Lightly oil the new pins. You want a film that prevents galling but won’t attract grit. Avoid heavy grease here; it traps dirt.
Step 6: Reinstall the Door-Check Pin and Clip
Slide the door check back into its pocket. Align the holes and drive the splined pin in from below using a brass punch. You’ll hear the tone change when it seats. Fit a fresh locking clip up top. If your check strap felt notchy or weak earlier, now’s the time to replace it, access won’t get easier.
Step 7: Reassemble the Hinges and Insert Pins (Mind Orientation)
Bring the hinge halves together without forcing the door up or down. Re-install:
- Upper hinge pin: bottom → up.
- Lower hinge pin: top → down.
Seat fully and fit new clips. If a pin resists the last few millimeters, wiggle the door gently while a helper nudges the pin; don’t hammer harder, misalignment will mushroom the end.
Step 8: Alignment That Actually Works
On NA/NB, the bottom hinge gives you most of your adjustment; the top hinge is semi-located. Up top, you’ll often see a tack-welded washer on the upper bolt that keys the hinge to the door. On the body side, there’s an alignment pin retained by a separate center nut, you do not remove that center nut just to pull or adjust the hinge; it simply holds the locator.
Get back to baseline: before loosening anything, trace the bottom hinge outline on the door and A-pillar with a paint pen. Those witness marks are your “return to stock” grid.
How to move the door cleanly:
- Support the door with the jack at the same “reference number” you noted earlier.
- Crack the bottom-hinge bolts loose just enough that the hinge can creep with nudges, not flop.
- Use controlled bumps: a plastic dead-blow or even palm pressure on the lower edge. Move a millimeter, snug, test close. Repeat.
What you’re aiming for: even front and rear gaps, outer skin flush with the fender (run your fingertips across the seam; you shouldn’t feel a step), and a latch that clicks shut with a gentle push, not a shoulder check. Watch the latch nose meeting the striker: if it climbs or drops onto the loop, you’re high/low. If you’re within a hair, mark the striker, loosen its two bolts, and nudge it a tiny amount. Tighten, test, repeat. Finish with blue threadlocker on the hinge bolts. If you want exact torque, grab the factory body manual for your year.
Helper trick: while you snug bolts, have a helper lightly lift on the outer door handle to hold height, then release before the final quarter turn. That “sets” the door where it naturally wants to live.
Full Hinge Replacement (instead of bushings)
If the hinge bores are ovalized or the knuckles are cracked, replace the hinges.
- Mark hinge positions on both the door and A-pillar.
- Decide on access. You don’t have to remove the fender on an NA/NB, but loosening or removing it (a handful of fasteners) dramatically improves tool angles and lets you clean rust and leaves behind the wing. Lots of folks spend more time trying to avoid fender removal than just doing it.
- Support the door, remove the check pin, then unbolt hinges from the door side first. Swing the door slightly to reach the body-side bolts with a box wrench.
- Swap hinges like-for-like. Watch the cast L/R and UPPER/LOWER stamps and the locator patterns; some aftermarket sets look similar but aren’t interchangeable across positions.
- Reinstall and align using the Step 8 method.
Wiring: If You Remove the Door Completely
You can leave the harness attached and rest the door on a stand, but if you need it fully off: peel the rubber boot at the A-pillar, reach in, and unplug the connectors. Edges inside the pillar are sharp, wear gloves. Feed the harness back through, lift the door straight up off your support, and store it on a padded surface.
Do You Need to Remove the Fender?
Not required for NA/NB, and plenty of owners do the job with the fender on and some patience. Nice to have: with the fender loosened or off, you’ll get socket-straight access to the body-side hinge bolts and a chance to vacuum out debris that traps moisture in the cowl/wing pocket.
Generation Notes
NA/NB: classic pin-and-bushing wear; this guide maps almost 1:1.
NC/ND: hinges tend to be serviced as complete assemblies; pins/bushings aren’t typical DIY service items. The door-support and alignment workflow above still applies. Always follow the body manual for model-specific fastener sizes and torque.
Common Pitfalls (and How to Avoid Them)
- Clips go flying: cover the hinge area with a rag and keep a magnet nearby.
- Mushroomed pins: don’t pound harder, dress the lip with a chisel, re-oil, then drive.
- Paint chips on edges: mask before you start; add a strip of tape across the fender/door seam as a “bump guard.”
- Door still sags after “fix”: you likely mixed bushing sizes or flipped pin directions. Recheck Step 5 and Step 7.
- Check-strap bite: don’t try to “yank” the check pin with pliers, compress or support and drive it cleanly. Eye protection on, always.
Close the door gently. It should latch without needing to lift the handle. Compare gaps side-to-side. Open to each detent; the check strap should hold the door at each step without snapping or grinding. If the door “bounces” off the striker or needs extra push, you’re a touch out, tiny nudges to hinge or striker will get you there. Do a paper-slip test on the weatherstrip: close the paper at several points; you should feel consistent drag when pulling it out.
Time, Difficulty, and When to Call a Friend
Budget 1–2 hours for pins/bushings and 2–3 hours for full hinge swaps the first time through. A helper makes alignment way faster and safer. If you see cracked hinge plates or damaged A-pillar threads, pause and let a body shop handle the repair before you make things worse.
While you’re in there: check the check-strap for cracks, snug the window regulator bolts, clean and lube the latch and door handle linkages lightly, and treat any surface rust at the hinge mounts before reassembly. That extra 15 minutes buys you years of quiet, crisp door action.


