
De-Powering the Miata Steering Rack: What It Really Is
A proper de-power turns a Miata power rack into a true manual unit by deleting the assist piston and locking the torsion valve. You keep the quicker 15:1 ratio for sharp response, lose the springy on-center feel, and accept heavier low-speed effort that disappears once rolling.


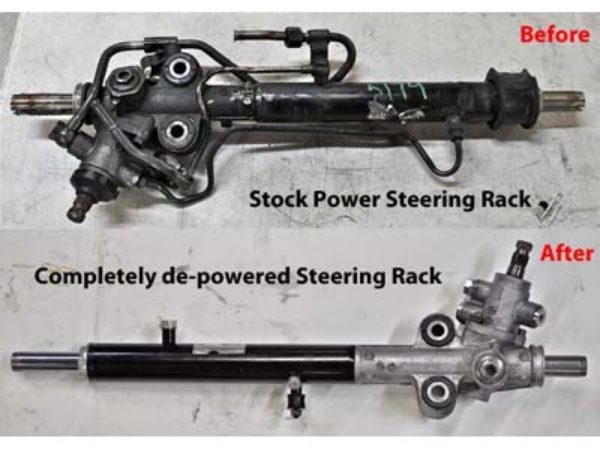
A proper de-power takes a power rack and converts it into a true manual unit by removing the internal assist piston seal(s), capping the ports, and locking the torsion/spool valve. That last step, eliminating the torsion-bar’s elastic “give”, is why a well-done de-power feels tight on center instead of springy. You keep the quicker power-rack ratio (roughly 15:1, about 3.0–3.3 turns lock-to-lock depending on year) instead of the slower OEM manual rack (about 18:1, nearer 3.3 LTL on most NA/NB manuals), so response stays lively even though there’s no hydraulic assist. The tradeoff is heavier effort at parking speeds, which most people find totally fine once the car is rolling.
Why People De-Power and the Big Myths
The draw is simple: more feel, faster ratio than the factory manual rack, fewer hoses and fluids, and a cleaner bay. The biggest myth is that looping the lines is “the same thing.” It isn’t. Looped racks still make the internal piston shove air/fluid around, and the torsion valve still winds up, which adds friction and a vague dead band at initial turn-in. Another myth says an OEM manual rack feels the same as a de-powered power rack. It doesn’t, because the manual’s slower ratio pushes you to work the wheel more in slaloms and tight transitions. Finally, some folks claim a de-powered rack is miserable on the street. In reality, effort is heavier only at walking pace, and alignment, tire width, and steering-wheel diameter easily swing the experience from “noticeably heavier” to “no big deal.”
Your Options
You’ve basically got four routes. The quickest is the looped-line delete: remove the pump and lines, loop the rack ports, and drive. It cleans up the engine bay fast but leaves friction and on-center slop you’ll feel every time you turn in. The recommended route is a true de-power: strip the rack, remove the assist piston seal(s), cap the ports, and weld or otherwise lock the spool valve so there’s no torsion wind-up. This preserves the quick ratio and produces the best feel, but it takes more care and at least one precise weld. You can also swap to an OEM manual rack if you find one, which bolts in cleanly on early NA cars and gives the lightest steering effort, but it’s slower, rarer, and not as lively. The fourth path is future-proofing: do a proper de-power now and add column-assist EPAS later if you want parking-lot ease without hydraulic plumbing.
What Changes on the Road and Track
Locking the valve removes the springiness around center and makes the car bite immediately when you turn the wheel. Low-speed weight definitely rises, especially with wide or sticky front tires and small-diameter steering wheels, but at anything above a crawl the effort normalizes and the car talks more clearly. The contact-patch “texture” comes through better, which is why sprint and autocross drivers love it. For very long stints or endurance racing, some drivers still prefer a well-sorted hydraulic system to reduce fatigue, but that’s about stamina, not outright precision.
Tools, Parts, and Prep
You’ll want a bench vise, snap-ring pliers, picks, a torque wrench, a paint marker for clocking, a hammer and punch, and a drill if you’re installing plugs. You also need the ability to MIG/TIG the spool valve lock, plus solvent and shop towels. On the consumable side, plan for new rack boots and clamps, fresh grease for the rack teeth and pinion, threadlocker, clean port plugs or AN caps, and inner/outer tie-rod service parts if yours are worn. If your rack bushings are tired, now’s the time to swap them.
The Proper De-Power, Step by Step
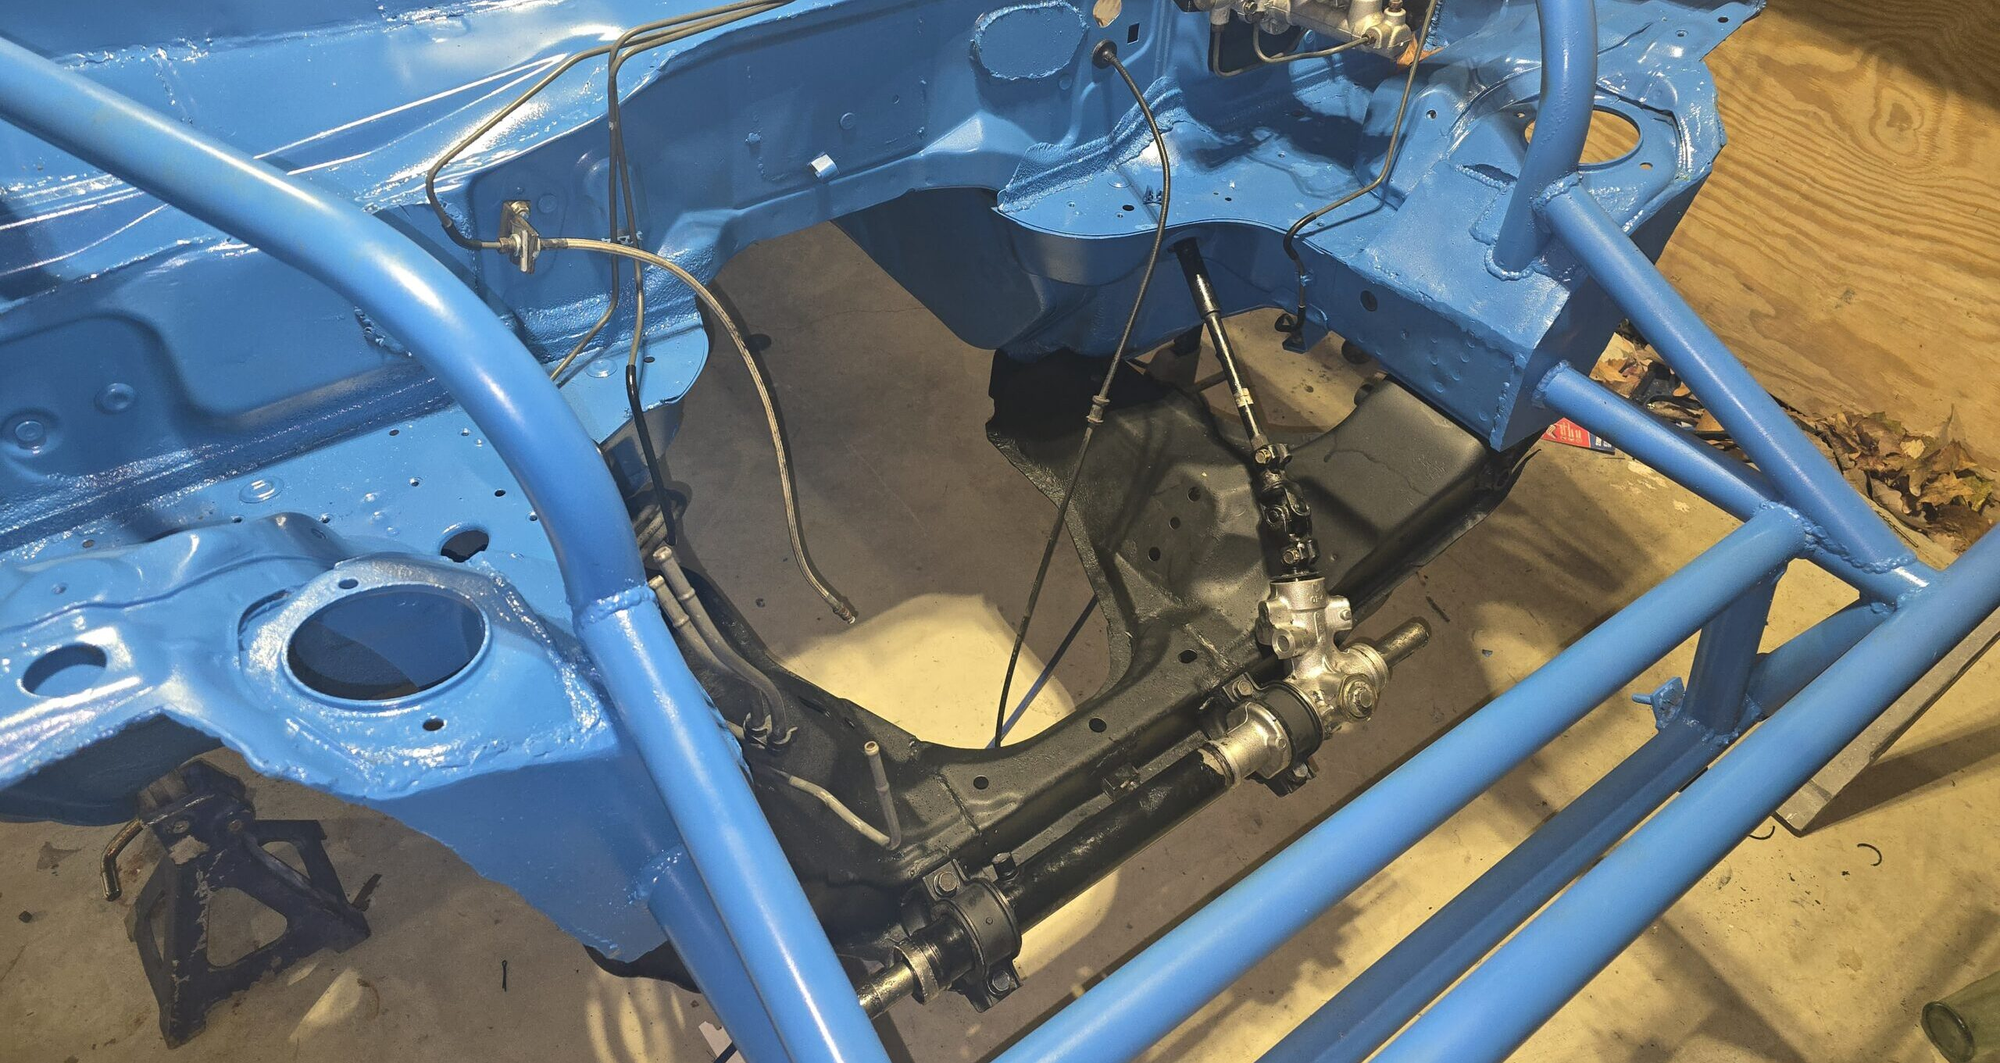
Pull the rack from the car and mark the steering-shaft clocking so the wheel goes back straight later. Strip the boots and inner tie rods, then remove the pinion housing and keep track of shims and orientation marks. Neutralize the hydraulics by removing the assist piston seal(s) or wiper on the rack bar so the piston no longer pumps; then cap the external ports instead of looping them. Eliminate torsion-bar compliance by welding or mechanically locking the spool/rotary valve so there’s no elastic twist, this is the crucial difference between “deleted power steering” and a true manual conversion. Clean, re-grease, and reassemble with correct torques, set the rack at exact center, fit new boots, and reinstall. Once it’s back in the car, center the wheel, torque the mounts and tie-rod ends, check for smooth, bind-free travel lock-to-lock, and book an alignment.
Alignment and Setup That Keep Effort Sane
Caster is your big lever. Instead of maxing it out, start around 3.5–4.5 degrees. That keeps healthy self-aligning torque on-track while trimming parking-lot effort. Front toe from zero to a whisper of toe-out sharpens turn-in without making the wheel artificially heavy or twitchy; more toe-out adds both weight and tramlining. Wheel diameter matters, going back toward a stock-size steering wheel reduces the force you need at a crawl, and tire choice is huge. Expect noticeably heavier parking effort with 225-plus R-compounds versus modest 195–205 street tires.
Pros, Cons, and How They Compare
A proper de-power delivers the best steering feel and keeps the quick ratio while shedding fluids and clutter. The downside is added low-speed effort and the need for precise welding and clean assembly. A looped-line delete is fast and gets you home if your pump dies, but you’ll feel friction and vagueness you can’t tune out. An OEM manual rack is the lightest to steer and the easiest to install if you find one, but its slower ratio makes the car feel busier in tight stuff. De-power plus EPAS later splits the difference: crisp manual feel most of the time, push-button assist when you’re inching into a tight spot.
When NOT to Do It
Plenty of owners start with a looped rack and later redo it with piston-seal removal and a locked spool valve because the improvement on center is that obvious. If a freshly de-powered rack feels brutally heavy, the first fixes are alignment and wheel size, not undoing the mod, dial back caster and ditch the tiny deep-dish. You probably shouldn’t de-power if your daily routine is tight urban parking on wide, sticky tires, if you can’t weld or inspect the valve lock properly, or if you simply prefer the calm, filtered feel of good hydraulic assist. All valid choices.
Safety, Quality, and the “Don’t Ruin a Good Rack” Talk
Precision matters. A sloppy or misaligned pinion/valve weld can introduce bind or uneven effort and will prematurely wear the rack. Keep grit out during grinding and welding, clean everything thoroughly before reassembly, and always torque the tie rods correctly. Verify no contact or binding at full lock both directions before the first drive, then get a proper alignment immediately, return-to-center and steering weight live or die on those settings. If the welding or inspection step makes you nervous, buy a professionally de-powered rack from a specialist and bolt it in with confidence.
If you want maximum steering feel and the quicker ratio without the maintenance of hydraulic assist, do the full job: remove the internal assist seal(s), cap the ports, lock the spool valve, and align with sensible caster. If you just need a quick fix, loop the lines, but expect to redo it properly once you’ve felt what a true de-power can do.


