
Building a Road-Legal “Safari” Miata: Lift Kits and All-Terrain Tires
A safari Miata takes the car’s lightweight, RWD charm and adapts it for dirt roads, forest trails, and campsite runs—without losing street manners. The result? A Miata that commutes during the week and explores backroads on the weekend.


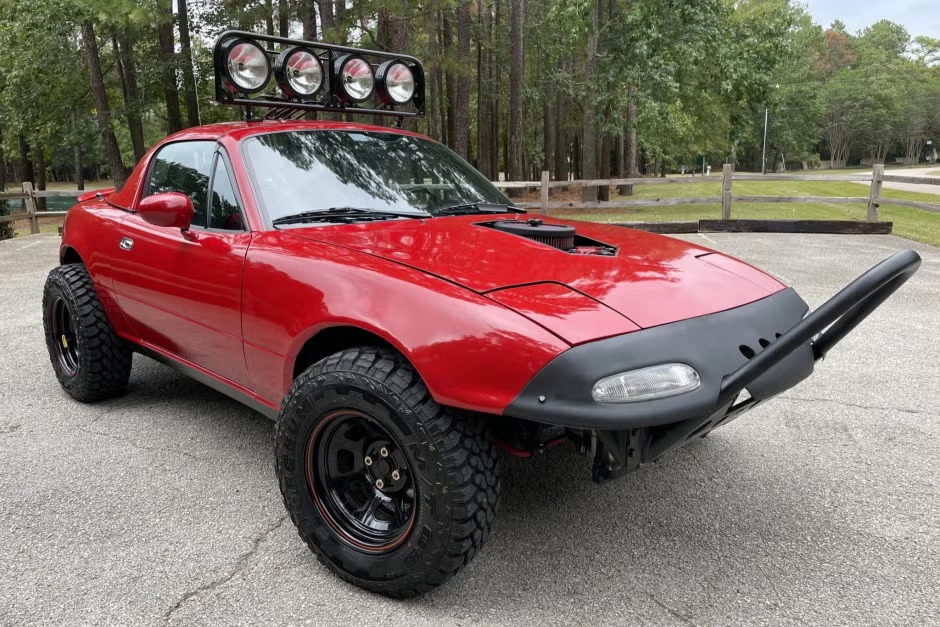
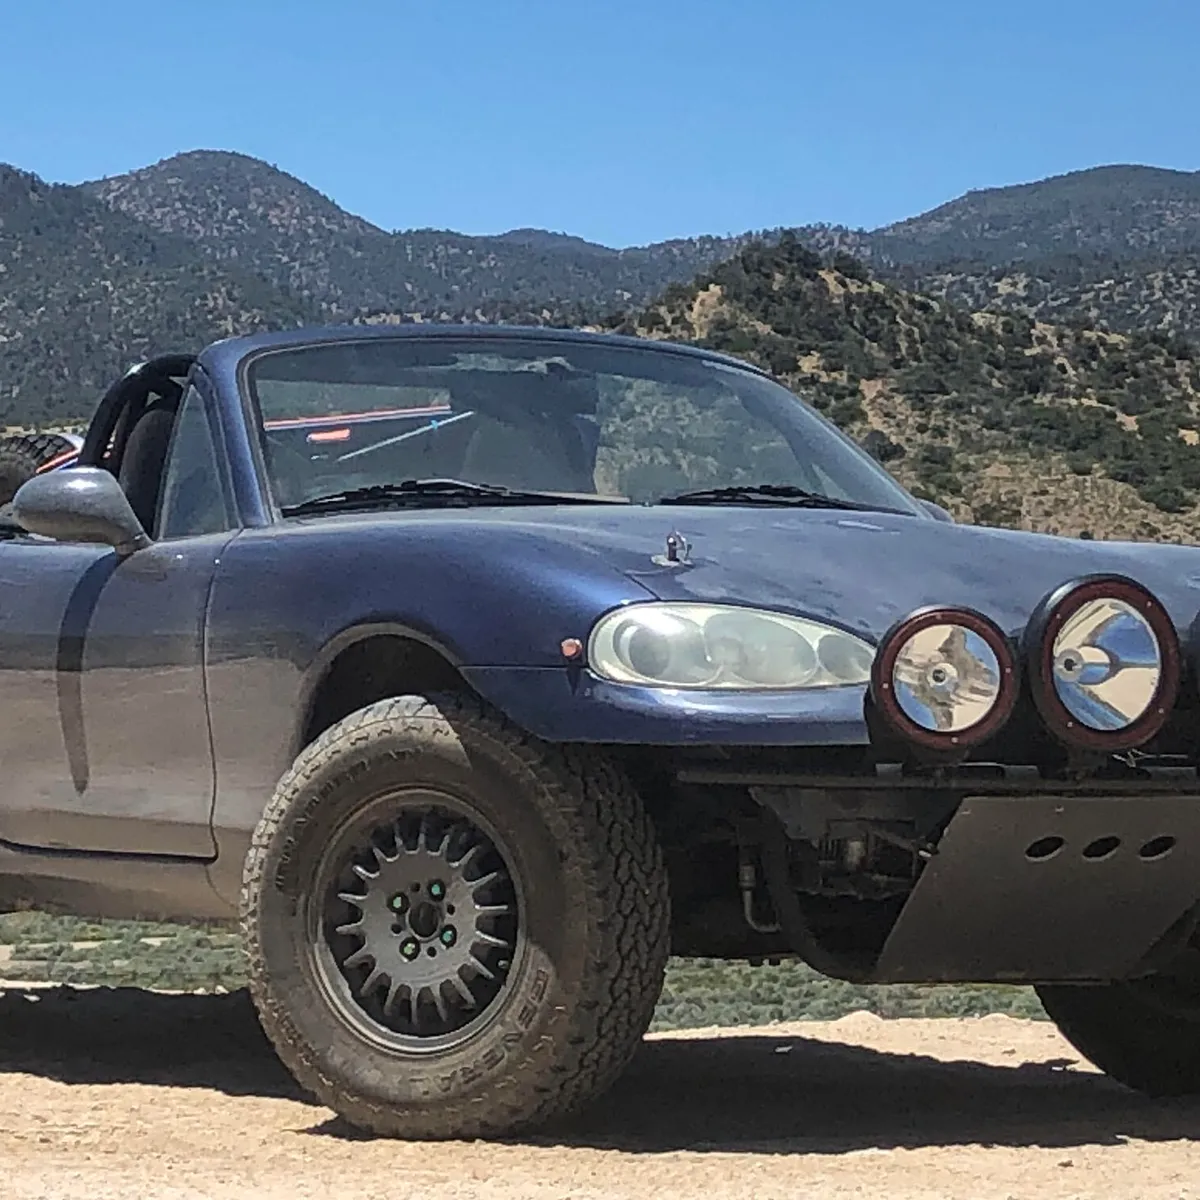
A safari Miata keeps everything you love about the car, lightweight, simple, rear-drive fun, and nudges it toward dirt roads, forest service trails, washboards, and campsite access. The goal isn’t rock crawling; it’s a road-legal trail runner that still commutes happily. The core recipe is more ground clearance, real underbody protection, mild all-terrain tires, practical cargo solutions, legal auxiliary lighting, and proper recovery points.
Reality Check
From the factory, Miatas sit low, roughly 4.9–5.3 inches on many ND trims and around 4.5–5 inches on NA/NB, which explains why ruts and high crowns scrape the belly. Storage is also severely limited: figure roughly 340–410 pounds depending on year and trim, and that total includes people, luggage, rack gear, and any tongue weight from a hitch tray. Pack ultralight and be intentional. For public roads in the U.S., stick to tires with a DOT marking on the sidewall and avoid “NHS” (Not for Highway Service) ATV or UTV knobbies no matter how aggressive they look.
Lift Options
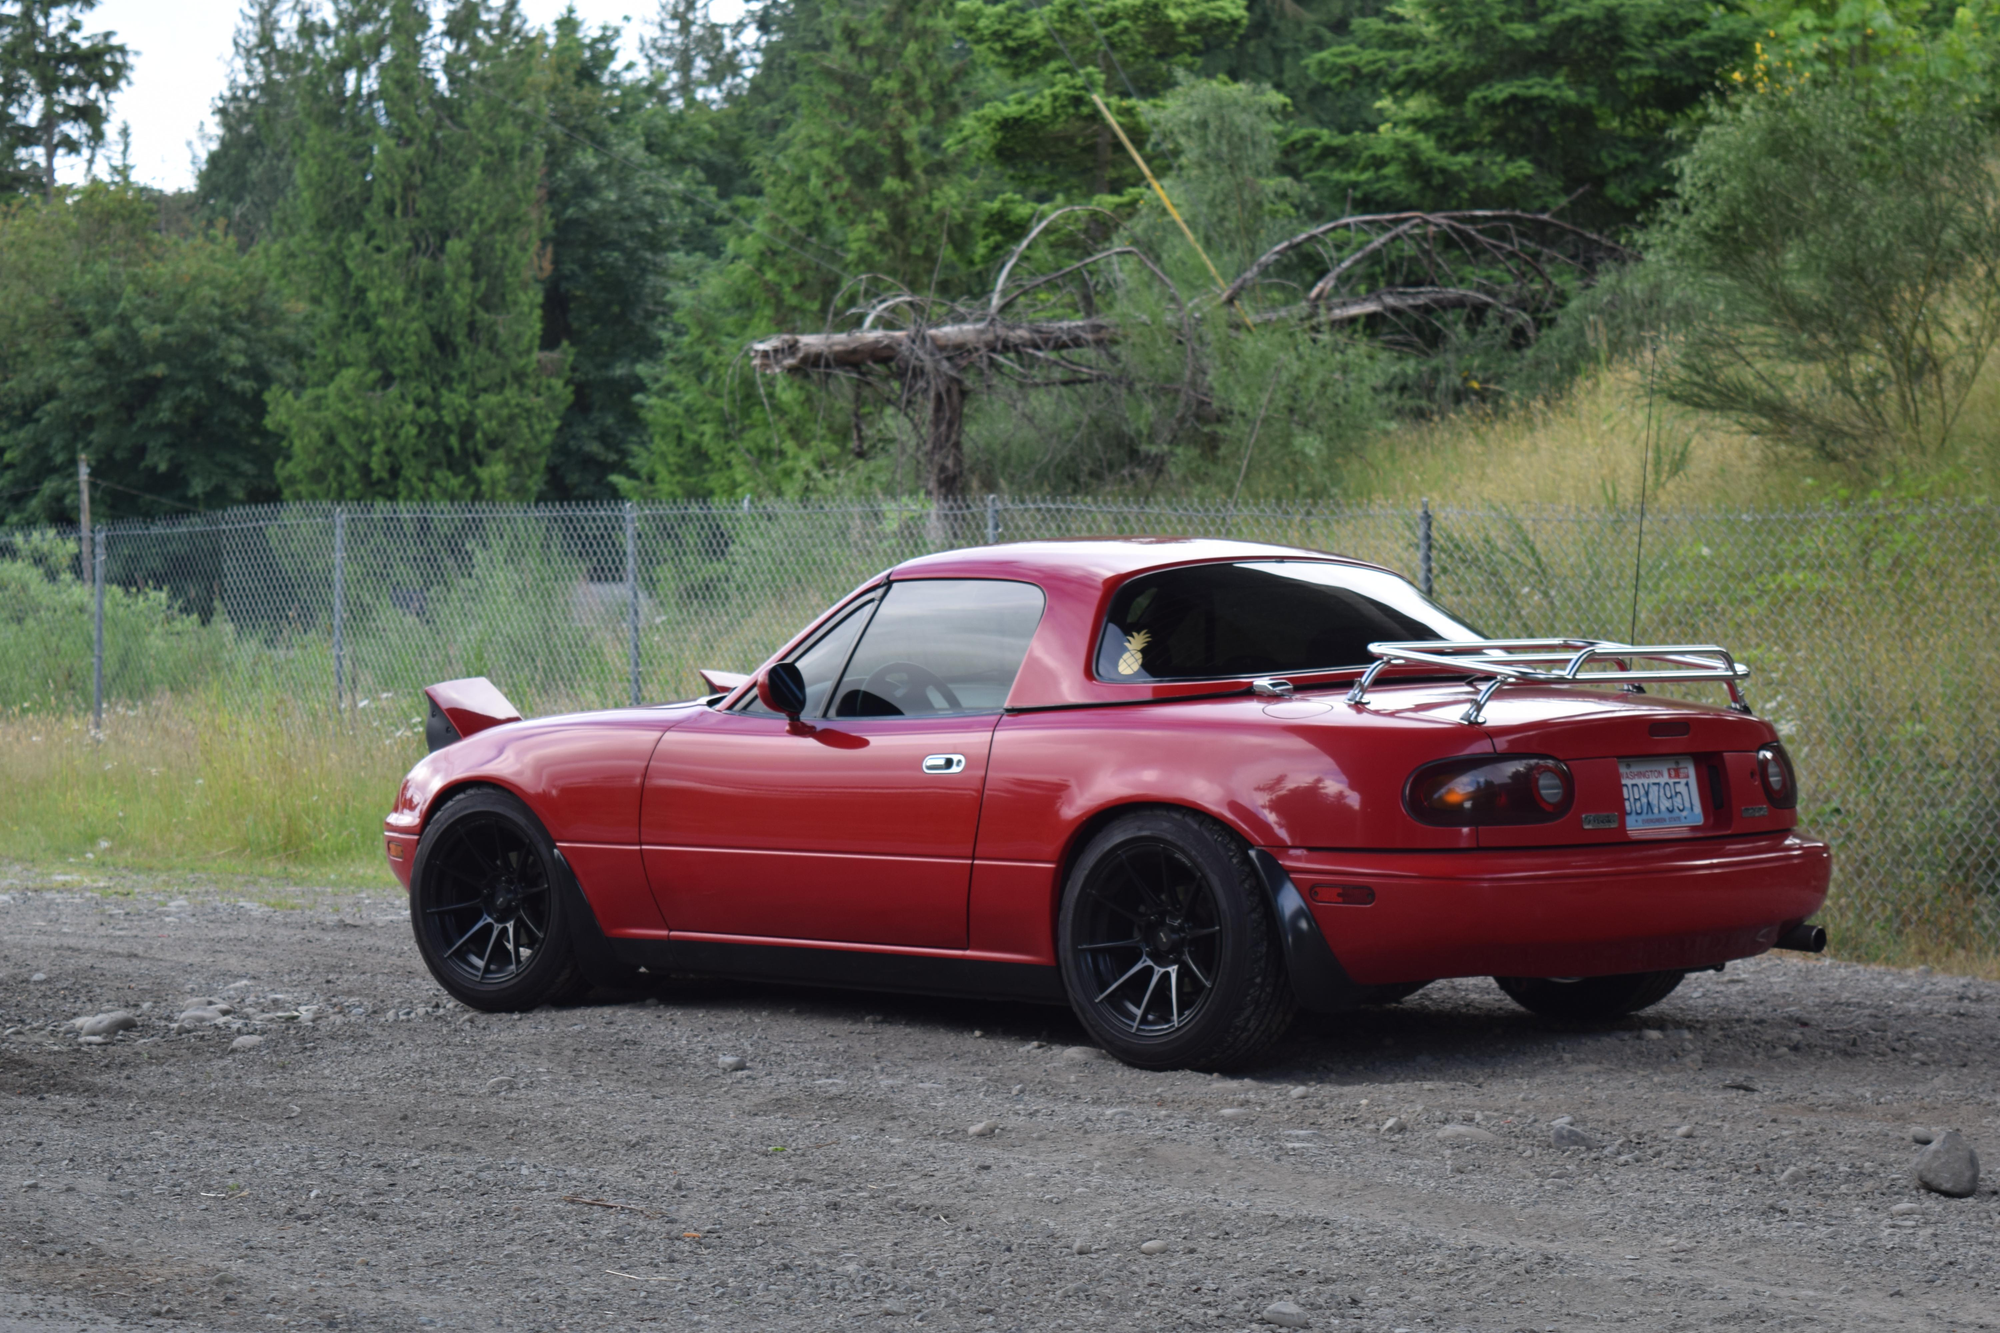
For NA and NB cars, a 3-inch spacer-style lift that relocates the lower shock mount is the common, proven route. Expect about three inches in front and a touch more in the rear, with geometry that remains friendly for light off-road use. Pair the spacers with compliant shocks and fresh, progressive bumpstops; overly stiff springs and short travel will make the car pogo over washboards. With this lift, plan on roughly 25.5-inch overall tire diameter for minimal drama; around 26.0 inches can work with trimming and careful steering-lock checks. All-in-one rally packages are convenient if you want a one-shot buy. ND owners have fewer true bolt-on lift choices and quickly run into liner clearance issue when chasing bigger tire diameters, so aim conservatively.
Tire Sizing, Wheels, and Fitment
Thinking in diameters, mild lift or near-stock height, 195/60R15 or 195/65R15 keeps unsprung weight and gearing in check. The safari sweet spot is often 205/65R15 at about 25.5 inches, which balances footprint, comfort, and clearance with a 3-inch lift. If you want the all-out look and a bit more bite, 215/65R15 sits near 26 inches and usually needs a bit of fender and liner massaging plus careful lock-to-lock verification. Stick to 15×7 to 15×8 wheels with moderate positive offsets to keep scrub radius reasonable; pushing offset too far invites rubbing that you’ll solve with metal and plastic. Remember that larger tires raise effective gearing, so expect a speedometer that reads low and slightly lazier acceleration; correct with a GPS habit or a signal calibrator if your generation allows it.
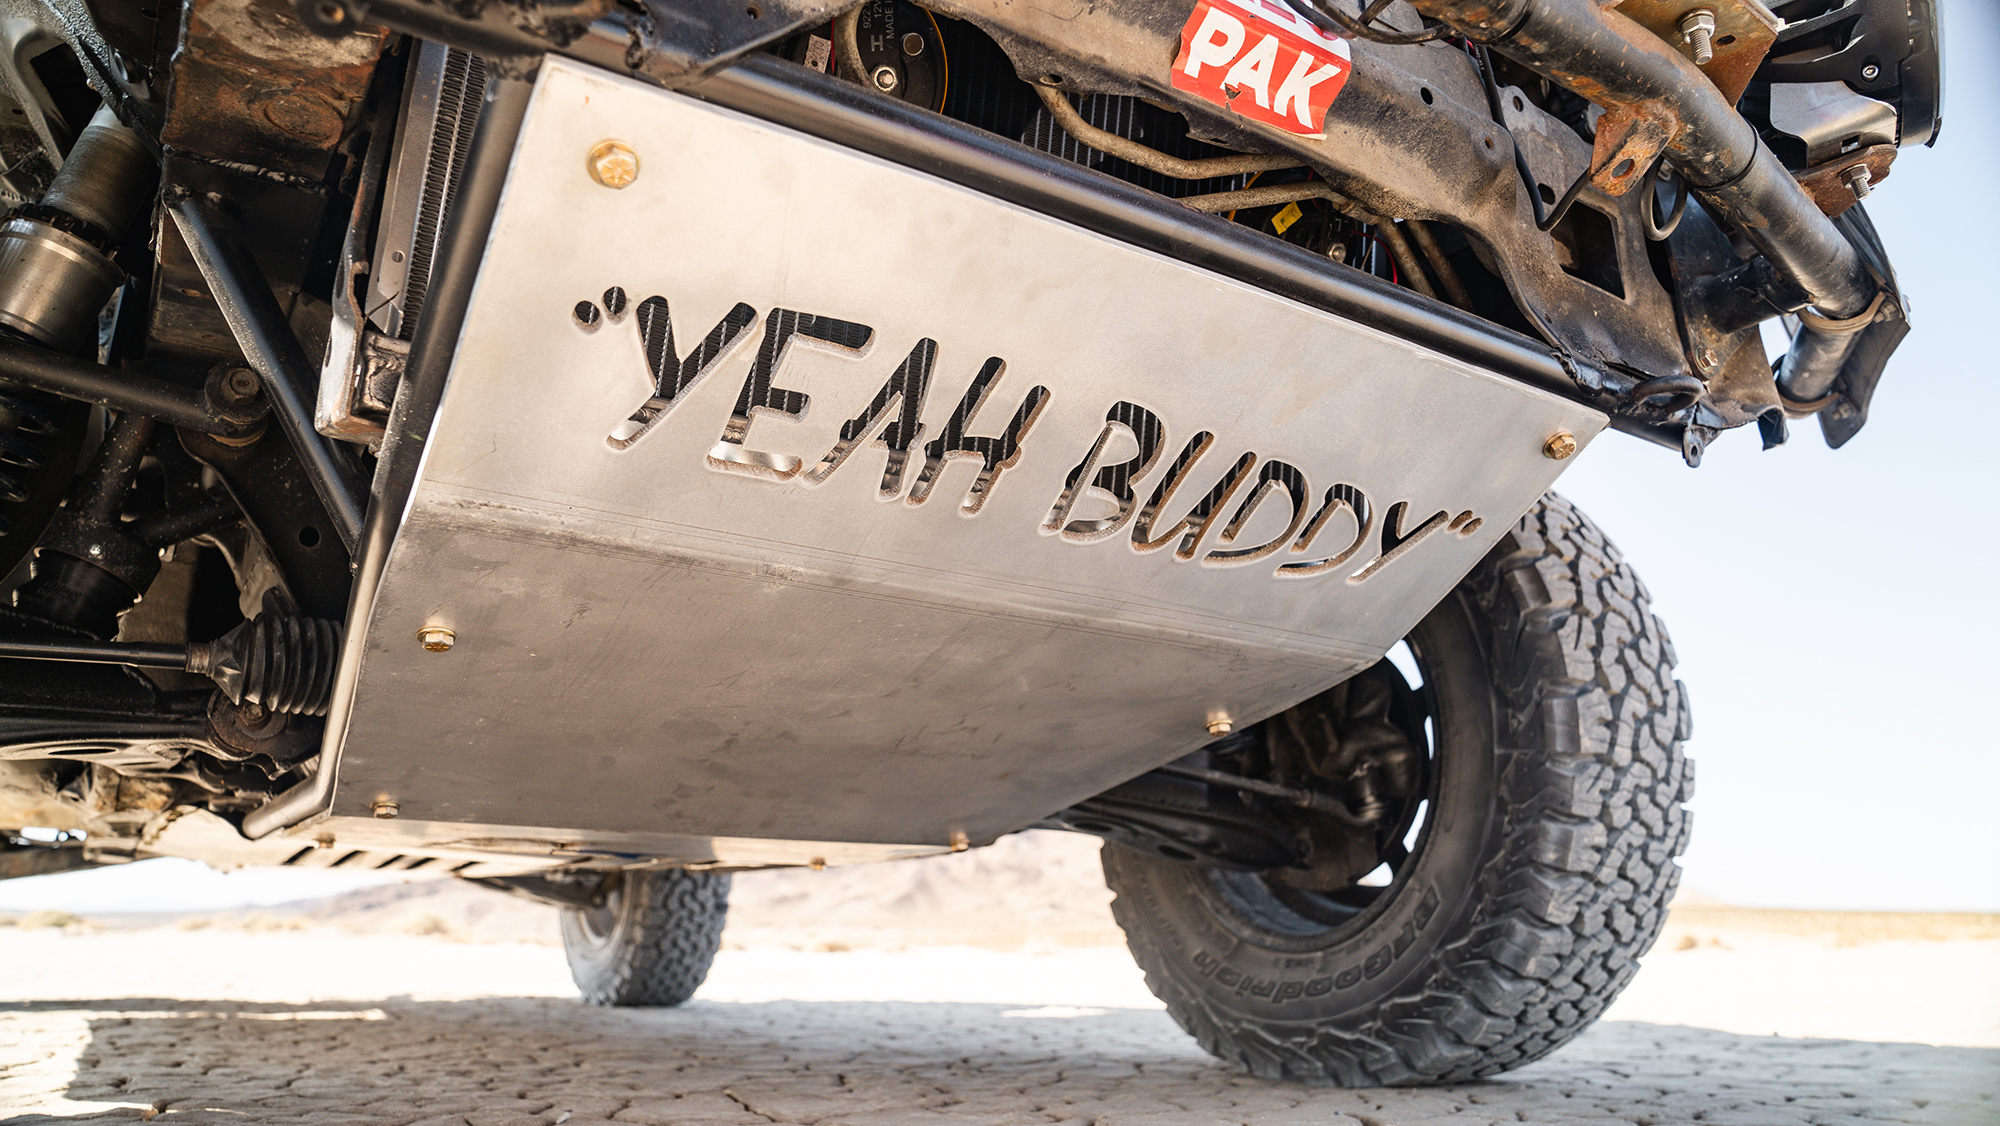
Underbody Protection (Skid Plates and Undertrays)
The stock plastic splash pan isn’t armor. Add a sump guard that ties into the subframe to protect the oil pan and crossmember from rocks and ruts. Aluminum undertrays are tougher than plastic and help airflow; pairing a proper skid plate with a robust tray makes daily commuting to trailheads far less stressful.
Alignment and Suspension Tuning for Dirt
Set alignment for stability, not lap times. A bit of front negative camber, zero to slight toe-in at the rear, and as much bump travel as you can preserve will keep the car planted on choppy surfaces. Fresh, progressive bumpstops are cheap insurance against hard bottoming. Softer or even stock sway bars free up articulation; oversized bars can make the car skate on chatter.
Recovery Points, Hitches, and Cargo
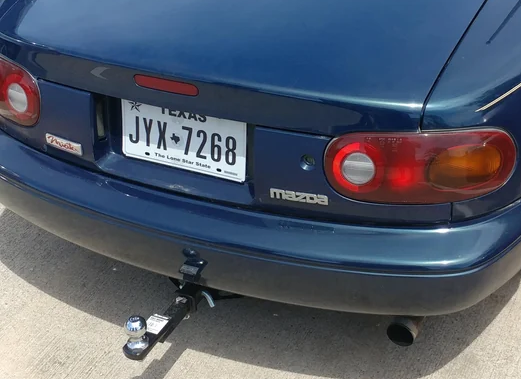
Replace the tiny factory “baby teeth” with accessible, motorsport-style tow hooks that can actually take a strap. A 1.25-inch receiver hitch on NA/NB opens up cargo trays and bike racks so fuel and muddy gear stay out of the cabin, but always respect Class-1 limits and your overall payload cap. If you’d rather skip a hitch, trunk-mounted luggage systems add roughly 50–75 liters of waterproof storage without drilling, and vacuum-cup roof bars are a flexible solution for boards or skis when used within their load ratings.
Lighting That Stays Street-Legal
Keep headlamps compliant and add SAE-marked fog or driving lights on a dedicated, labeled switch. Wire them through a fused relay so you don’t overload factory circuits. Many states restrict the height, number, and on-road use of auxiliary lamps; light bars are typically off-road-only and should be covered or switched off on pavement.
Water, Dust, and Reliability
Skip deep crossings; the car doesn’t run a snorkel and the belt-driven accessories dislike water. Reduce splash speed to protect electronics and keep the radiator breathing. Replace tired door and window seals and the shifter boots to cut dust intrusion. After dirty days, rinse mud out of the radiator fins and undertrays to keep cooling healthy.
Camping Loadout (Ultralight, Because Miata)
Do the math against the roughly 340–410-pound payload. Two adults, water, tools, a hitch tray, and a tent can eat the margin fast. Favor a compact freestanding tent, ultralight pads and bags, a small canister stove with a titanium pot, and collapsible water storage. Carry a modest battery bank and keep camp lighting frugal; alternator output on later cars is decent but not truck-sized. Transport fuel and water in soft containers on a rack or tray, not inside the cabin.
Recovery and Trail Etiquette
At minimum, bring a compact shovel, short traction boards, a soft shackle and kinetic rope with ratings well above vehicle weight, a tire plug kit, a portable compressor, and a jack with a stable pad. Attach straps only to rated tow points, never to control arms, sway bars, or bumper skins. Airing down modestly on rough sections can help, but air back up for pavement.
Legal Checklist (U.S. Street Use)
Use only DOT-marked tires on public roads and keep off-road bars covered or switched off. Mount auxiliary lights within your state’s height and quantity limits. Ensure tires are adequately covered and there are no sharp protrusions after trimming. Finally, respect the payload label; overloading is both unsafe and citable.
Budget Expectations for Parts
Expect something like 270–350 dollars for a spacer-style lift, 180–300 for a skid and undertray depending on material and design, 60–200 for a pair of tow hooks depending on style, and 250–350 for a receiver-type hitch. A 15-inch wheel and all-terrain tire package typically falls in the 900–1,400 range, and auxiliary lighting with proper wiring can range from about 150 to well over 500 depending on lamp quality and switching.
Common Pitfalls
Rubbing at full lock or full bump is the classic complaint; stepping down to about 25.5 inches, adding small rack limiters, trimming liners, or adjusting offset solves most of it. Over-stiff suspensions turn gravel into a rodeo, go back to compliant dampers and softer bars so the car can move. Payload creep is real, so weigh your kit and move bulky items to a hitch tray or trunk rack while keeping fluids to campsite minimums. Finally, illegal lighting is an easy ticket; covers and a dedicated switch keep you out of trouble.
A safari Miata is permission to take the scenic route. With a 3-inch lift, roughly 25.5-inch all-terrain tires, a real skid plate, proper tow hooks, and smart packing, you unlock forest roads and trailheads your stock car avoided, without sacrificing weekday manners or street legality.


